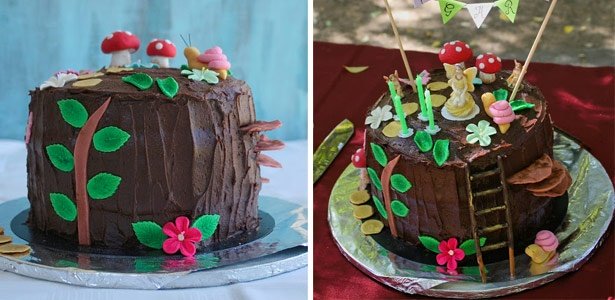
Enchanted fairy cake

10 servings Prep: 1 hr
Rate this recipe
Perfect for a little girls birthday party!

By Food24 March 02 2016
0
SHARES
1.4k
VIEWS
Recipe Disclaimer
Tap for method
Tap for method

Ingredients (16)

CAKE:
3x 20 cm cake — vanilla
350 g butter — unsalted, room temperature
650 g icing sugar
50 g cocoa powder
50 ml milk — warm
TO DECORATE:
plastic icing
Food colouring — assorted colours
edible flowers — icing
cookie cutters
50 g chocolate — coated pretzel
1 Tbs chocolate — chips
edible gold dust
edible glitter
cake bunting
wire (0.45mm)
fairy figurines
Tap for ingredients
Tap for ingredients

Method:

For the cake:
Ensure that the vanilla cakes are completely cool before icing them.

To make the icing: place the butter in the bowl of a freestanding mixer and beat to soften. (And electric mixer will also do the trick.) Sift in the icing sugar and cocoa and beat until the mixture comes together. Add half of the milk and continue to beat slowly until the milk has been incorporated. Scrape down the sides of the bowl, then continue to add milk gradually until the icing has a soft, spreadable consistency. (You may not need all of the milk.)

Place one of the cakes on a plate. Spread a thin layer of icing over the top. Place another cake on top and repeat the process. Place the last layer on top and ice the top and sides of the cake with chocolate icing.

Use a palette knife to give the icing a rough look. Make vertical lines around the cake by gently spreading the icing upwards from bottom to top. Use the palette knife to make rings on top of the cake.

While the icing is still soft stick the stems and leaves around the sides of the cake. Add the flowers, butterflies and remaining decorations and finish with a light dusting of glitter.

For the decorations:
Get creative here and make whatever you feel like.

Tip: Make the fondant decorations three days before the party so that they have time to dry out.

Branches/stems – I used brown gel colouring to make brown fondant. Roll out thinly and use a sharp knife to cut out long, thin stems to stick up the side of the cake.

Leaves – I used green food colouring to make green fondant. I then used a leaf cutter which I picked up at a nearby plastic shop to cut out the leaf shapes. I left most of these to dry flat, but I also made a few curly leaves by gently curling them over a skewer to dry. I finished them off with a light dusting of green food colouring powder to give a shading effect.

Butterflies – I used a cutter for these too, you should be able to find one at most plastic stores. I used pre-coloured pink fondant icing for the butterfly bodies and added some detail by decorating the wings with tiny green fondant circles. I also added some shimmer with a light dusting of white glitter. I left a few of the butterflies to dry flat and stuck these around the side of the cake. The rest I dried in a “V’ shape by placing the butterflies inside a piece of paper that had been folded into a v-shape, and put these on top of the cake.

Flowers – I used some beautiful store bought icing flowers. Most baking shops have a good selection of really pretty ones, or you could make your own with a cutter.

Mushrooms – I got this idea from Sprinklebakes.com. Roll out some brown fondant and cut out 6cm circles. Press the edges between your thumb and forefinger to give them a ruffled look. Dust with some cocoa powder and leave to dry completely. On party day cut some small slits into the side of the cake and insert the mushrooms.

Toadstools – these were great fun to make and so easy. I used white and pre-coloured red fondant. Roll some white fondant icing into a tube with a 1cm diameter. Taper the top slightly and flatten the base so that it can stand nicely. Roll some red fondant into a walnut sized ball, then gently press your thumb into the middle and gently shape the ball into a toadstool cap. Cut out a thin circle of white fondant and press this into the bottom of the cap to give it a more authentic look. Decorate the top of the toadstool cap with tiny white fondant circles attached with a small amount of water. Attach the caps of the toadstools to the stems. Dust the base of the stems with a tiny bit of cocoa to give them a “muddied” appearance and leave to dry. On party day I used toothpicks to help secure them to the cake – sticking one half into the toadstool stem and the other half into the cake.

Fairies – I used small fairy figurines that I bought from a nearby fairy shop. I cut out a small circles of cardboard to stick to the base of each fairy before popping them onto the cake so as not to ruin them with chocolate icing!  

Fairy ladder – I love this idea. Set aside two chocolate coated pretzel sticks for the sides of the ladder. Then cut another two or three pretzel sticks into rungs of the same length. Melt the chocolate chips, then dip one side of each rung into the melted chocolate and glue it onto a pretzel stick. (I found it easiest to glue all of the rungs onto one stick first. I then dabbed some chocolate onto the other ends of all the rungs and stuck them to the other stick.) Leave to dry on some baking paper.

Snails – I used some yellow food colouring to make yellow fondant. I rolled the fondant into a sausage and shaped this into the snail’s body, lifting the head up and tapering the tail slightly. I then rolled some pre-coloured pink fondant into a long thin sausage which I curled around to make the snail’s shell. I stuck this to the body with a little water. I cut two short pieces of wire and used these as the snail’s tentacles. I used a small ball of crumpled up baking paper to help hold up the snail’s head while he was drying.

Stepping stones – these were simply small circles cut out of yellow fondant. I decided to cut them out free hand rather than use a cutter to give them a more irregular and natural look. I also finished them off with a light dusting of gold dust.

Bunting – you could buy bunting from any party shop, but I decided to save myself one hundred ront and make my own! Making your own also means you can personalise the name and choose your own colours. I simply cut diamonds out of thin card, folded them in half and then added my text to one side. I glued the cards onto some pretty string which I attached to two skewers and bobs your uncle – homemade bunting!

Glitter – no fairy party is complete without fairy dust, and I was sure add a dusting of glitter to the cake as the final touch.

Recipe reprinted with permission of Cupcakes & Couscous. To see more recipes, please click here.

To receive quick and convenient weekday recipes, join our Easy Weekday Meals mailing list, and for up-to-date trending food, restaurant and wine news subscribe to our Editor’s Weekly newsletter.


New recipes on Food24

Next Post

Leave a Reply

Your email address will not be published. Required fields are marked *

Food24 Team Loves

Newsletter

Get weekly access to our best recipes, tips and tricks

Sign Up

Login to your account below

Fill the forms below to register

Subscribe to Newsletter

Retrieve your password

Please enter your username or email address to reset your password.

Recipe Disclaimer

All recipe content is the responsibility of the party from whom such content originated. You agree that you use the content on Food24 at your own risk. Please read our editorial policy.